{scope}
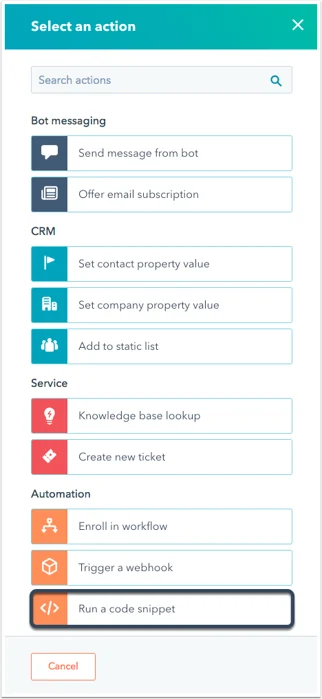 A continuación, asígnale un apodo a tu acción. En el panel de edición de códigos, verás nuestra plantilla predeterminada para Node.js 10. x. Los detalles del objeto «event» y los formatos de objeto de respuesta posibles se detallan a continuación.
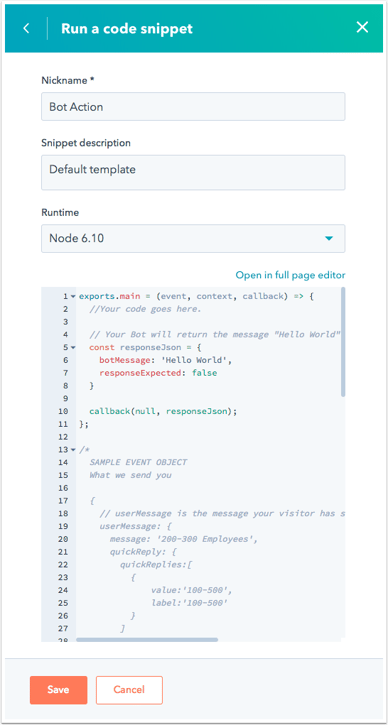 El código se activará cuando se alcance la acción guardada en una conversación.
Hay tres aspectos principales que debes tener en cuenta al trabajar con fragmentos de código:
* La función `exports.main()` se llama cuando se ejecuta la acción del fragmento de código.
* El argumento `event` es un objeto que contiene detalles para el visitante y la sesión de chat.
* La función `callback()` se utiliza para pasar datos al chatbot y al usuario. Se debe llamar en la función `exports.main`.
El objeto `event` contendrá los siguientes datos:
```json theme={null}
//example payload
{
"userMessage": {
// Details for the last message sent to your bot
"message": "100-500",
// The last message received by your bot, sent by the visitor
"quickReply": {
// If the visitor selected any quick reply options, this will be a list of the selected options.
// Will be 'null' if no options were selected.
"quickReplies":[
// A list of quick reply options selected by the visitor
{
"value":"100-500",
"label":"100-500"
}
],
},
"session": {
"vid": 12345,
// The contact VID of the visitor, if known.
"properties": {
// A list of properties collected by the bot in the current session.
"CONTACT": {
"firstname": {
"value": "John",
"syncedAt": 1534362540592
},
"email": {
"value": "testing@domain.com",
"syncedAt": 1534362541764
},
"lastname": {
"value": "Smith",
"syncedAt": 1534362540592
}
}
},
"customState":{myCustomCounter: 1, myCustomString:"someString"}
// Only present if it customState was passed in from a previous callback payload
}
}
```
La función `callback()` se utiliza para enviar datos al bot. El argumento debe ser un objeto con los siguientes datos:
```json theme={null}
//sample payload
{
"botMessage": "Thanks for checking out our website!",
// This is the message your bot will display to the visitor.
"quickReplies": [{ value:'option',
// Passed to the bot as the response on click
label:'Option' // Gets displayed as the button label
}],
// the quickReplies object is optional
"nextModuleNickname": "SuggestAwesomeProduct",
// The nickname of the next module the bot should execute. If undefined, the bot will follow the default configured behavior
"responseExpected": false
// If true, the bot will display the returned botMessage, wait for a response, then execute this code snippet again with that new response.
"customState":{myCustomCounter: 1, myCustomString:"someString"}
// Optional field to pass along to the next step.
}
```
## Limitaciones
Los fragmentos de código en los bots deben terminar en un lapso de 20 segundos y solo usar 128 MB de memoria. Exceder estos límites ocasionará un error.
## Bibliotecas disponibles
Varias bibliotecas de Node.js están disponibles para usar dentro del fragmento de código.
* [async](https://www.npmjs.com/package/async)
* [lodash](https://www.npmjs.com/package/lodash)
* [mongoose](https://www.npmjs.com/package/mongoose)
* [mysql](https://www.npmjs.com/package/mysql)
* [redis](https://www.npmjs.com/package/redis)
* [request](https://www.npmjs.com/package/request)
* [aws-sdk](https://www.npmjs.com/package/aws-sdk)
Las bibliotecas se pueden cargar usando la función `require()` normal en la parte superior de tu código.
```js theme={null}
const request = require("request");
exports.main = (event, callback) => {
request("http://time.jsontest.com/", function (error, response, body) {
const responseJson = {
botMessage: "The current time in GMT is " + JSON.parse(body).time,
responseExpected: false,
};
callback(responseJson);
});
};
```
El código se activará cuando se alcance la acción guardada en una conversación.
Hay tres aspectos principales que debes tener en cuenta al trabajar con fragmentos de código:
* La función `exports.main()` se llama cuando se ejecuta la acción del fragmento de código.
* El argumento `event` es un objeto que contiene detalles para el visitante y la sesión de chat.
* La función `callback()` se utiliza para pasar datos al chatbot y al usuario. Se debe llamar en la función `exports.main`.
El objeto `event` contendrá los siguientes datos:
```json theme={null}
//example payload
{
"userMessage": {
// Details for the last message sent to your bot
"message": "100-500",
// The last message received by your bot, sent by the visitor
"quickReply": {
// If the visitor selected any quick reply options, this will be a list of the selected options.
// Will be 'null' if no options were selected.
"quickReplies":[
// A list of quick reply options selected by the visitor
{
"value":"100-500",
"label":"100-500"
}
],
},
"session": {
"vid": 12345,
// The contact VID of the visitor, if known.
"properties": {
// A list of properties collected by the bot in the current session.
"CONTACT": {
"firstname": {
"value": "John",
"syncedAt": 1534362540592
},
"email": {
"value": "testing@domain.com",
"syncedAt": 1534362541764
},
"lastname": {
"value": "Smith",
"syncedAt": 1534362540592
}
}
},
"customState":{myCustomCounter: 1, myCustomString:"someString"}
// Only present if it customState was passed in from a previous callback payload
}
}
```
La función `callback()` se utiliza para enviar datos al bot. El argumento debe ser un objeto con los siguientes datos:
```json theme={null}
//sample payload
{
"botMessage": "Thanks for checking out our website!",
// This is the message your bot will display to the visitor.
"quickReplies": [{ value:'option',
// Passed to the bot as the response on click
label:'Option' // Gets displayed as the button label
}],
// the quickReplies object is optional
"nextModuleNickname": "SuggestAwesomeProduct",
// The nickname of the next module the bot should execute. If undefined, the bot will follow the default configured behavior
"responseExpected": false
// If true, the bot will display the returned botMessage, wait for a response, then execute this code snippet again with that new response.
"customState":{myCustomCounter: 1, myCustomString:"someString"}
// Optional field to pass along to the next step.
}
```
## Limitaciones
Los fragmentos de código en los bots deben terminar en un lapso de 20 segundos y solo usar 128 MB de memoria. Exceder estos límites ocasionará un error.
## Bibliotecas disponibles
Varias bibliotecas de Node.js están disponibles para usar dentro del fragmento de código.
* [async](https://www.npmjs.com/package/async)
* [lodash](https://www.npmjs.com/package/lodash)
* [mongoose](https://www.npmjs.com/package/mongoose)
* [mysql](https://www.npmjs.com/package/mysql)
* [redis](https://www.npmjs.com/package/redis)
* [request](https://www.npmjs.com/package/request)
* [aws-sdk](https://www.npmjs.com/package/aws-sdk)
Las bibliotecas se pueden cargar usando la función `require()` normal en la parte superior de tu código.
```js theme={null}
const request = require("request");
exports.main = (event, callback) => {
request("http://time.jsontest.com/", function (error, response, body) {
const responseJson = {
botMessage: "The current time in GMT is " + JSON.parse(body).time,
responseExpected: false,
};
callback(responseJson);
});
};
```